
 I found this cute and easy craft on Mommy's Kitchen for a teacher appreciation gift that kids could make themselves.
 The boys went camping this weekend, so Kenna and I made these for the kid's teachers.
 They were so easy! Kenna did everything except wrapping the floral tape around the pen.
 Wouldn't these look cute sitting on your desk on in your kitchen? You could decorate the pot too with a bright bow or whatever your heart desires.
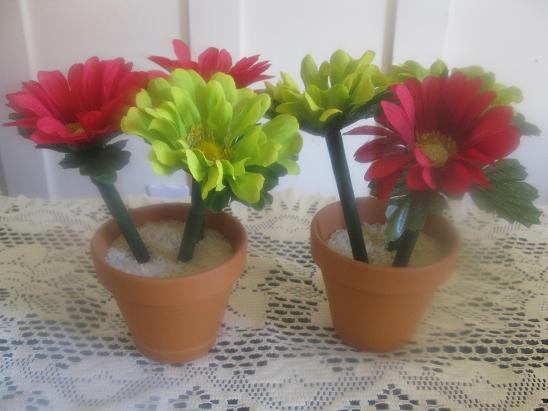 We used rice to stand the pens up, but you could use dried beans or small stones.
 And the best thing about these pens is that not many people will walk off with a pen with a big flower on the end of it! I'm always losing my pens!!!
Thank you to Mommy's Kitchen for this fun craft. Check out her site for some excellent recipes!

Pretty Flower Pot Pens
small clay flower pots (I used 3 inch pots) (.69 each)
artificial flowers ($4)
Bic Pens ($1)
green floral tape ($1.97)
scissors (free)
tacky glue (free)
Pinto beans, coffee beans or decorative stones (beans $1.18 a bag)
ribbon or craft paint ($1.97)
small wooded decorations (.25 each)
Paint the clay pots with your desired color and pattern and let dry completely. While the pots are drying assemble your flower pens. If you do not want to paint the pots you can just tie a pretty ribbon around the rim and tie in a bow with a pretty coordinating color and add a wooden decoration like we did. If adding the wooden decoration you can glue it on at this point. Cut the stem of the flower to about half the size of the pen. We cut them to about 2-3 inches. If it is a really thick stem, you can take the outside coating off, and only use the interior wire for support.
Remove the little plug/cap at the end of the pen. discard the plug cap. This is where you are going to place the end of the flower into. Add some hot glue around the end of the flower base and place the wire into the pen chamber. Push down to make sure it attaches. It will dry rather quickly. Now assemble and glue the rest of the flowers. We are doing two for each small pot I think you can do up to three with no problem. Larger pots can hold more pens.
When the pens are dry begin wrapping the pen with the floral tape near the writing tip. Continue wrapping up the pen until you are almost at the end. I don't think it really matters which end you start one. I stopped at the end of the pen you will see a line. where the pen starts to change shape. Do not go all the way to the very end. If you do the cap will not go on and off easily. You can do a second layer if you want, but we only did one. Clip the floral tape and tack the end down with a clear glue if needed. It should pretty much stick without using the glue.
Fill the flower pot with a type of dried beans (I use pinto beans because they are brown like soil), but you could use coffee beans or small dark stones. Stick the floral pens into the beans and arrange them into a bouquet. Attach a wooden decoration to the front of the clay pot using tacky glue. The hot glue doesn't really want to stick. If you are sending this gift with your child to school, you may want to put the beans in a plastic bag and put them in the pot with instructions. The teacher can assemble it when she receives it, and it won't dump all over your child's backpack.
Click here to enter to win a $100 Carrabba's Gift Card and to read my review of Carrabba's Italian Grill.


These are adorable!
ReplyDeleteDarling idea!
ReplyDeletegreat idea, love it!
ReplyDeleteThis is my first visit to your blog.I'm so glad I found you. I had planned only to say hello, but I was lured by your prior posts and stayed far longer than I planned. I really enjoyed myself. I hope you are having a wonderful day. Blessings...Mary
ReplyDeleteOne of my principals has a bunch of these on her desk, and, you're right: I don't think anybody has walked off with any of them! :D
ReplyDeleteMelody they turned out beautiful. Your daughter is so cute and so proud of those flower pot pens. Great Job Kenna.
ReplyDelete